© Ennis Physiotherapy Clinic, 3A Barrack Close, Barrack Street, Ennis, Co. Clare V95 X437 Tel: (065) 6840757
Spinal Problems Neck + Back Pain Disc Injury Whiplash Posture
Lower Limb Injuries Walking + Running Ligament Injury Snowsports Injury Home Exs Prog
Upper Limb Injuries Ligament Sprains Tendon+Muscle Golf + Bike Set Up Useful Links


065 6840757

Mon - Fri 9.30am - 8.30pm


3a Barrack Close, Barrack St., Ennis, Co. Clare V95 X437
If you're new to a road bike, you may feel on your first rides as if your body is being thrown unnaturally forward and seem as if you could go over the bar at any second. Stay relaxed and practice riding in low-traffic areas, and soon your brain will learn that this position is as comfortable and as safe as any other.
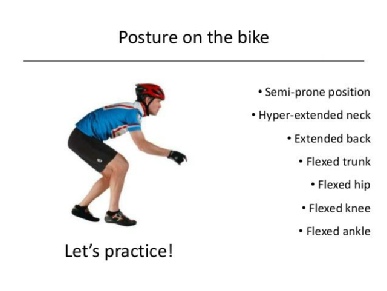
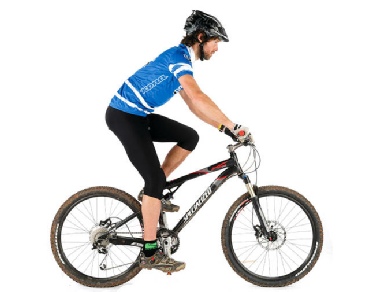
The Stance
Start seated. Keep your back straight and shoulders down so your lungs can fill with air. Relax your arms, with your elbows slightly bent, your hands resting comfortably on the bar tops several inches away from the stem. Try to avoid a death grip on the handlebars. To get more power from your glut (buttock) muscles, lower your upper body toward the top tube. If you stand, position your butt over the saddle with your weight (your belly button) centred over the bottom bracket.
Get (Back) 'On Your Bike’
There are three riding possibilities:
- Neutral; the most common, in which your hands are generally on top of the hoods (which cover the brake levers) so you have access to the brakes and gear shifters. If the bike fits you properly, you will be able to turn your head, not have too much pressure on your hands, and feel comfortable for extended periods of time. From the side, your torso and arms should almost form a 900 angle at the shoulders. Keep your shoulders broad + relaxed (away from your ears) and your chest forward.
- On the hills
- Descending; Lower your torso forward and move your hands to the lower handlebars - called the "drops" especially on long, steep inclines. Your hands will readily reach the brake levers, and you'll have more leverage when you use them. You'll also shift your weight slightly back in your seat to give you more traction on the rear wheel.
- Ascending; Climbing hills is about more than strength.
- Prepare: Before the road rises, take a drink, relax your body and maybe even slow down. If it's hot, unzip your jersey.
Downshift; Get into an easier gear that lets you turn the pedals quickly without pushing hard. Once the chain is under a lot of tension it becomes more difficult to do so. - Conserve Energy; Keep your breathing deep and steady. Resist the urge to gun it early. If you feel good as you approach the top, that's the time to push.
- Play Mind Games; Climbing is as much mental as it is physical. Focus on a tree or a sign up ahead and watch the distance shrink, sing, smile + try to forget you're climbing
- Move Around; Alternate sitting and standing to use all your muscle groups. Move your hands to the hoods and push against them for leverage as you pedal.
- Get Excited; As you near the top, relax + breathe, look around at the scenery and prepare for the descent.
It's OK to.
- Go at your own pace. Other riders may be waiting at the top, but that's not your problem.
- Get off and walk. Everyone has done it. When remounting, make sure your bike is in an easy gear, check for traffic, then angle your bike across the road.
- Zig-zag. If the hill is really steep, tack across the road if safe.
3. Turn the Corner
Most novices assume that steering through corners requires turning the front wheel. This is true at very slow speeds, but mostly you guide the bike around curves by leaning the frame and shifting your weight in the direction you're turning.
- Firstly relax - loose joints allow you to move around on the bike easily and stay off the brakes.
- Next, look ahead, through, and around the bend. You'll be tempted to look straight into the corner of the turn. If you do, that's where you'll ride—possibly right off the road. Look as far down the road as possible by following the pavement markings until they disappear on the horizon. When you look far ahead, your bike and body will naturally veer in the correct direction while your peripheral vision picks up any obstacles on the road in front of you. As you coast around the corner make a wide arc.
- To do this, you'll use the whole lane. As you enter the turn, stay close to the outside of the curve. Riding into it, aim for the inside of the apex of the corner (but don't cross into the other lane). As you exit, head back to the outside of the lane.
- Position your feet so your inside pedal is up and your pedal closest to the outside of the road is down. This will naturally angle the bike somewhat, but it takes advantage of the bike's natural gravitational pull.
- Gravitational forces of riding through a curve will cause you to accelerate, always lower your speed entering the turn by barely touching the brakes. The thing to avoid is braking hard in the turn.
The cycling professionals talk of staying "light" on the pedals as it keeps them ready for anything their competitors throw at them. If they want to surge ahead, they can quickly do so without shifting gears. When they do choose to shift, it's easy and whisper-soft because the tension on the chain is so low. Sometimes you'll need a burst of speed to get past an obstacle quickly, This makes you nimble and efficient. Being light is also being relaxed—an advantage in any situation.
Staying light on the pedals is all about spinning the pedals in nice circles with smooth, evenly distributed power. Aim for a cadence of between 80-90rpm.
If your butt lifts slightly off the saddle when your cadence is high, it's because your legs are hammering downward—but neglecting the rest of the stroke. This is referred to as "pedaling squares"—the opposite of nice circles.
Starting with your right foot in the 2 o'clock position, control the power of your right side stroke so that you don't just force it down. This uses mostly the quads muscle in the front of the thigh. As you reach the bottom imagine dragging the bottom of your shoe against the ground. Your foot should start to pull back, engaging your glut / buttock muscles. In effect your heel is low or level with the pedal.
At this point, your left foot will be into the start of the power position, ready to push down. Your right foot will be tempted to slack off and take a break.
Lifting, or pulling, the right pedal up and over the back and top to complete your circle is the most important (and trickiest) part of the stroke. Lift up and over through the 8 to 11 o'clock positions. This will take pressure off the down-stroke power in your other leg and allow your feet to move together in beautiful, flowing circles.
It's best to pull your foot up hard into the top of your shoe then forward over the top of your circle. This uses your calves and gluts and feels a little like scrambling up a rocky slope.
Mind your pedaling when climbing—that's when it's hardest to keep things together and flowing.
Pedal Like a Pro
Cycling Etiquette
The 25-week beginners’ training plan is ideal for all novice cyclists, riders who want to get back to fitness after some time off the bike or those who have never previously followed a structured training plan. If you’re targeting a 60-mile (100 km) sportive, a charity ride or just want to improve your cycling fitness, it’s the perfect plan to achieve these goals.
Beginner Training Plan
A few basic rules of the road for cycling
- Be Predictable: Nobody feels safe around a bike that's swerving, not using signals, and stopping suddenly.
- Stick to the Law: Act as if your bike is a vehicle. When riding in the road, always signal, make complete stops at signs, and wait for red lights for your turn to ride through.
- Ride to the Left: If there's no shoulder on a two-way road, it's always safer to stay a couple of feet out from the edge so that other vehicles have to use the other lane to pass you.
- Turning Right: You'll want to signal + move to the right side of the lane. Check over your shoulder for oncoming traffic and signal before moving over.
- Stay off footpaths: People entering or exiting doorways and driveways make riding on footpaths an accident waiting to happen.
- Ride as you would drive - as if you were trying to pass a driver's-license test.
- Use lights when low light conditions exist. A blinking light is more likely to stand out against the background and make you most visible to other road users.
- Wear high visibility / reflective clothing to maximise visibility.
- Obey all the rules of the road.
- Cycle in full control of your bike.

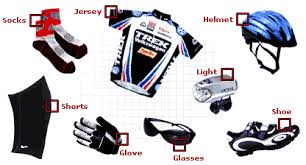
- Jersey - It's cut longer in back and shorter in front to cover the base of your spine and keep material from binding up at your midsection when you're riding. It also has rear pockets to carry stuff.
- Shorts - They're made of multiple panels of material to create a smooth, snug fit. And they include a chamois—a padded liner that protects you from saddle soreness and chafing.
- Shoes - If you're using platform pedals—the kind you don't clip your shoes into - go for the stiffest sole possible. Most road-riding shoes come with cleats that engage with (clip into) the pedals, to maximize your power output.
- Helmet - Most helmets sold in bike shops meet the same safety standards irrespective of the cost but some manufacturers making lids meant to prevent concussions as well as more serious trauma.
- Arm, Leg and Knee Warmers - These are small sleeves designed to fit over a specific part of your body to extend your clothing - turning short-sleeved jerseys into long, and so on. They can also be peeled off easily if conditions warrant.
- Gloves – Cycling gloves come with extra-thick material in the palm to protect your hands in case of an accident and relieve pressure on the nerves in wrists and palms. Full-fingered versions keep you warm on chilly days.
- Headgear - To absorb sweat and give you minimal eye protection from the sun, small, traditional cycling caps fit under your helmet. In the winter, hats vary from tight skullcaps to caps with visors and special built-in earflaps
- Shoe Covers - Thick socks are impractical in snug cycling shoes. Shoe covers slide on to shelter your feet from wind and cold.
Cycling Gear
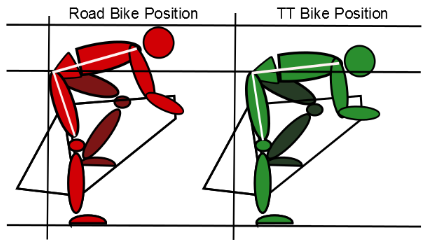
Have a new bike? Get a professional Bike Fitting to see if you need to adjust these parts.
- Stem - The stem affects how far you have to reach for the handlebar and is probably the most commonly replaced part because arm and torso lengths vary from rider to rider. Handlebar - The width and depth of the bar also affect your reach.
- Seat Post - You may need one that allows the saddle to be moved forward or back to optimise your position.
- Saddle - The seat is another commonly changed part. Some are more suitable for male / female users. Some riders need one that has different pressure points or a cut-out area. After an hour of riding, your bottom will tell you if you have the right model.
- Cables - If a stem or handlebar swap makes the reach significantly longer, your brake and shifter cables may need to be replaced with longer ones.
(Bike) Fit
The right foods do great things for your body. On the bike, they give you energy; off the bike, they repair and recharge your muscles.
Carbohydrates should be your main energy source. The key is to know what type to consume, and when.
Protein is needed to rebuild your muscles so that your effort on the bike makes you stronger for next time.
Fat is an excellent source of fuel, giving you the ability to cycle longer and harder without crashing from low blood sugar. It also keeps you from getting hungry. Go for natural sources of it, like olives, nuts, seeds, and avocados. Long moderate intensity cycling stimulates the body to preferentially use fats as the energy source and so is a great way of losing (fat) bodyweight
- A tyre lever (or two)
- A spare tube patch, glue, and emery cloth (essentially a patch kit without the box)
- Cash (for food, bus fare, or as an emergency fund
- CO2 and tube inflator
- ID/insurance card / debit card
- A small multitool
- A hand pump for backup duty
- Lights
- Bike computer to give you speed, distance, time etc
Food for Cycling
Saddle Bag Stuff
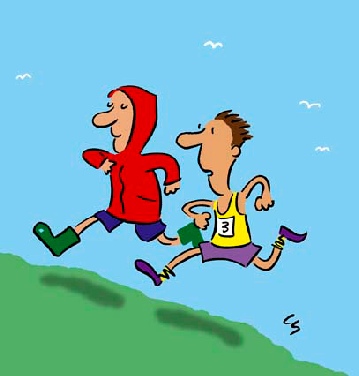
Everyone can be a runner once they start. There will always be faster people and those who appear to glide along effortlessly. Many new runners feel a sense of embarrassment that they might be too old, too fat or too unfit to run. Try and not listen to these voices in your head. You don’t have to run fast; start very slowly at a pace that is right for you.
Running can help to make you feel healthy. It can help to improve your mood, positivity, health and confidence in different ways - so focus on the number of minutes you can run rather than on just the calories consumed. Weight loss is not the only goal. The goal is to enjoy running. Runners will tell you that nothing beats that post-run feeling; positivity, energy and a sense that you are invincible. The stress of the day is lifted and you feel strong, more confident and alert as your fitness improves. After a run you are more likely to eat better, sleep better and think better.
All these things add up to help you be mindful I + decisive.
Start to Run
Before starting any new exercise programme it always makes sense to chat to your doctor especially if you have any underlying medical conditions, aches or pains, or have not exercised for a while.
Good Running Form or Technique
1. Keep your head straight: Look straight ahead of you, about 30 to 40 metres out in front, and avoid looking down at your feet. Looking down will create tension in your neck and shoulders. Keep your jaw and neck relaxed.
2. Don't hunch your shoulders: Your shoulders should be back and down. Keep them relaxed and avoid tensing them. Don't hunch over as this restricts breathing, allowing less oxygen to get to the muscles.
3. Keep your hands relaxed: Your hands should be relaxed, but don't let them flop. Tight hands can cause tension all the way up to the back and shoulders.
4. Keep your arms bent at 900 degrees at the elbows: Your elbows should be bent at a 900. Try to swing them forward and back, not across your body. The arm movement helps to propel you forward, so swinging them sideways is a waste of energy.
5. Lean slightly forward while running: Don't bend forward or backward from the waist as this places pressure on the hips. Some experts advise running in an upright position, but using your body weight to lean forward a bit while running can reduce heel strike and help you land on the middle of your foot.
6. Keep your hips stable: Your hips should remain stable and forward-facing. Don't stick your bottom out or rock your hips from side to side. Keeping this position in your hips can help prevent low back and hip pain.
7. Don't lift your knees too high: Land with a slight bend in the knee. This helps to absorb the impact of running on hard surfaces. Don't lift your knees too high and avoid bouncing up and down. Your knees should be lifting forwards rather than upwards.
8. Aim for a mid-foot strike: Landing on the middle of your foot is the safest way to land for most recreational runners. Avoid striking the ground with your heel or your forefoot first. Your foot should land below your hips – not too far out in front of you.
9. Don't strike the ground heavily: Aim for short light steps. Good running is light and quiet. Whatever your weight, your feet should not slap loudly as they hit the ground. Light steps are more efficient and cause less stress to the body.
10. Breathe deeply and rhythmically: Whether you breathe through your nose or mouth, try to breathe deeply and rhythmically. Avoid shallow and quick breaths. Try to aim for one breath for every two strides, but don't be afraid to try longer breathing.
Eating and drinking
It’s important to have energy for your run, but don’t overdo it. Avoid having a large meal within two hours of your run. You need blood to be in your muscles, not your digestive system. However, a light snack, such as a banana, before running is fine. If you would like to lose weight remember that the total fuel into your body must not exceed the fuel being burned by your normal daily activity plus your additional exercise. Long (>45mins) steady moderate intensity exercise tends to be better for burning fat stores. But you need to build u[ to this.
Provided you are drinking enough throughout the day, this should not be problem for most recreational runners. Ob longer runs some people like to have a water bottle with them while running but don’t overdo it. Ideally you should drink before you become thirsty, just not too much.
Finding time and staying on track
If you decided to take on more exercise you must commit to it.. This is great for your health, but will require effort and dedication. Identify all the potential reasons / barriers that could get in the way of you exercising more and work out in advance how you’re going to deal with them. Commit some time and keep to it until it becomes part of your conscious planning of your day / week. Keep a record to remind you of the benefits and your progress. Expect some blips – they will happen! You might have a hectic week at work, be away from home, or even experience illness or injury. If you’re feeling under the weather – particularly if you have a temperature – do not run but lapsing is not a failure. If you falter, take a breath and start afresh!
Running with a buddy or a group can really help.
This link is to some weekly podcasts that will guide you through a ‘Couch to 5 Km' - C25K - programme h
For the runs in Week 1, you will begin with a brisk 5-minute warm-up walk, then you will alternate 60 seconds of running, with 90 seconds of walking, for a total of 20 minutes.
C25K graduates wanting to do more see this link
Strength and flexibility podcasts link
What to wear
If you haven’t suitable clothing don’t let this be an excuse – you don’t need much and once you have sorted, you’re ready to go.
You need a good pair of running shoes. A decent pair of running shoes can cost more than ‘fashion’ trainers and running socks can also reduce your risk of blisters.
For clothing you don't really need technical gear. You need something loose and comfortable preferably in a breathable material, like cotton. If you keep running regularly some specialist clothing would be a good investment.
Women should also consider using a sports bra, which provides additional support – it will reduce breast movement by around 55% versus 30%. Additional layers may be needed in the wet or cold e.g. gloves or hat.
Warming up and down
Each Couch to 5K run should include a five-minute walk at the beginning and end of the session. This is a preparatory brisk walking stage. As for stretching before a run, opinion is divided on whether this is necessary or even helpful. Currently dynamic stretching pre exercise and static post exercise is the prevailing wisdom. The concerns often relate the possibility of over- or inappropriate stretching.
For a warm-down, the worst thing you can do is stop running or exercising suddenly, as this prevents the timely clearance of waste products from within the muscles (such as lactic acid) so keep walking / exercising gently until your breathing and pulse have fully recovered to normal levels for you.
You may want to put on an extra layer of clothing while cooling down to prevent getting cold
How to run
Good running technique will help make your runs feel less tiring, reduce your risk of injury and, ultimately, be more enjoyable.
Avoid striking the ground with your heel or your forefoot first. Landing on the middle of your foot is the safest way to land for most recreational runners. Your foot should land below your hips – not right in front of you


Running while well endowed with large breasts can be more than just embarrassing - It’s painful and can affect your running performance negatively
Excessive movement, thumping against your chest, weighing you down can cause problems. The top three complaints from well endowed female runners include .
- Back Pain
A pair of D-cup breasts weigh 7-10 Kg which over time can pull your upper trunk forward, forcing you into a hunched-over running posture. This will decrease your stride efficiency and increase injury risk. The weight is supported mainly by the bra straps and if they are too thin they will dig into the flesh across the top of the shoulders and may apply pressure to the nerves underneath, potentially causing numbness and pins and needles in the arms + hands
Correct support using wide straps and or a sports bra will help counteract this. Postural awareness as you run and specific strengthening exercises for the upper and lower back (pull-down and row variations) can help prevent back fatigue and poor posture. A strong core helps stabilize your spine - functional core strengthening exercises like forearm plank with alternating leg raises, prone plank on a stability ball, Superman, bird-dog, side plank, and abdominal twists will all help.
- The ‘Bounce’
How far your breasts move depends almost entirely on size and the elasticity of the skin covering the breasts. However, skin tends to lose its elasticity with age so the more your breasts bounce, the more they will do so during future runs if no action is taken.
During treadmill testing the average 38 D moved up + down about 12 cm during running. Small breasts bounce about 8 cm, which can still be uncomfortable.
High-support bras can cut the movement in half. Ideally your breasts should move in unison with your torso and not bounce independently of one another or the torso..
- Rubbed Raw.
The less your bra moves during your run, the less it will rub. The larger your breasts, the more difficult it is to prevent excessive movement. If your skin is rubbed excessively you can try using creams or gels to allow friction free movement. You apply a thin strip of sports tape to the skin where you chafe. Wearing a sports bra that’s built with sweat-wicking materials can prevent skin irritations.
How to Find Your Best Running Bra
When purchasing a sports bra for the first time resist the temptation to buy online - go to a retailer to try on different styles. Look for bras with high-support elements such as moulded cups, underwires, padded straps, and multiple hooks. Try on as many bras as possible to find one which keeps the breasts in place without sacrificing too much comfort. If its not comfortable to wear walking and stretching, then don't even think about running in it. However don’t just go by the feel of a sports bra. The following are worth considering::
- The Band: It should be made of wide elastic material so it can support your breasts without causing back bulges or riding up when you lift your arms. You should fasten the bra on the loosest hook so, as it ages and becomes looser, you can tighten the fit.
- The Shoulder Straps: They should be wide and padded so they don’t dig into your shoulders.
- The Cups: To limit movement, the cups must completely cover your breasts (without leaving any creases or gaps). Keep in mind your sports bra cup size may be different from those you wear normally.
- The Underwire: It should sit on your ribs so it doesn't dig into your breasts or the tissue under your armpits.
- The Front Band: The centre of the bra should sit on your breastbone, squarely between your breasts.
If you are larger than a DD bra, you may need to consider a compression bra for some double-bra layering. This will help hold everything in place.
Try a few different styles on test runs if possible but this does incur a cost. However the benefit of comfort in the longer term is the goal. After a few runs you'll figure out which one suits your shape and size. In future if it suits then you can buy online.
Below is a couple of videos about the correct fitting of a sports bra
Running with Large Breasts
Picking up a new skill like swimming – one that involves getting your body to do things it doesn’t necessarily want to do – is a whole other ball game, or pool game, as it turns out. Swimming is a cheap + easy way to exercise. You need minimal gear – a swimsuit / trunks, some good goggles and a hat. After a few lessons you’ll be able to practise in your own time. There are few risks of injury to worry about. You are never too old, too unfit, too out of shape to swim.
It can take as little as three months to go from floppy-limbed, pool water drinkers to confident, capable swimmers. This is possible with appropriate training from a qualified swim coach.
Swimming isn’t like running or yoga or football. In those sports your body moves a little faster, or bends a little further, or kicks a little harder. But essentially they’re all movements you use unconsciously in your everyday life. Swimming asks a lot more of you. Much of it may feel unnatural and may even feel like there’s a constant battle for survival in the early stages.
Most pools expect you to shower before you enter the pool.
Most pools are requiring swimmers to wear caps, so it's best to be prepared and have one to hand.
Most goggles now have anti-fog coatings built into them so it's not necessary to spit into them any more to prevent fogging.
The flags above either end of the pool are for backstrokers to let them know they're approaching a wall for their turn or finish.
The pace clock is either a friend or an enemy. It never lies! Generally, you start on the "top of the clock" when the hand is on the zero and is a tool to help you keep track of your speed.
Start Swimming
The ‘Swim For A Mile Challenge’ is an annual event but you can start anytime to prepare for it. You can find details at your local pool about classes and coaches or look at www.swimireland.ie,
Link to Swim Ireland
Link to Speedo Improver Programme:
Lane Etiquette
- Choose the Correct Lane: The lanes dedicated to lap swimming may have signs with ‘slow,’ ‘medium,’ or ‘fast’ to indicate speeds expected of swimmers in those lanes. Pick a lane you feel comfortable in, follow the instructions to avoid collisions and don't be afraid to switch lanes if necessary!
- The lane sign may also indicate the direction of swimming within the lane – clockwise or anti-clockwise. Generally, keep to the right if there are no signs (anticlockwise). Adjacent lanes often alternate direction of swimming so be aware!
- If you want to overtake someone, you may do so, as long as the left side of the lane is free for you to pass. If being passed continue swimming at steady pace on the right and briefly stop at the end of the lane to allow them overtake or to get ahead of you.
- Give the swimmer in front some space - at least a quarter of the way down the lane before you push off.
- If you feel you are faster than most people in a lane, step up to the faster lane. As a general rule, be aware of others in the lane and swim on the correct side of the lane.
- Some pools also restrict what strokes are allowed in each lane so keep an eye out for these signs.
- Most pools don’t allow diving into the lap lanes. Also, never sit on the lane lines.
What to bring with you:
- At a minimum you will need your swimsuit, a cap, a pair of goggles and a towel.
- Additionally flip flops, shampoo, conditioner, body wash and moisturizer are commonly used..
- To care for your suit a swimsuit cleaner.
- Some loose change for any entry fee / lockers.
- Training Aids: Once you're ready to workout to the next level up you may need a
- Kickboard,
- Hand paddles or a pull buoy,
- Fins + / - snorkel,
- Resistance bands for warm ups and
- A drinks bottle.
- A water-resistant bag is useful to keep together on the deck , as is a net bag for carrying equipment.


Nordic walking is a sociable way for anyone to keep fit and be outdoors
Nordic walking originated as summer training for cross-country skiers in Finland. These days, people can be seen in parks and woodlands across Ireland walking with their poles – winter and summer – like it’s something they’ve done all their lives.
The main devotees of this rhythmical walking are older women and men, who are retired or semi-retired and keen to keep in good shape while enjoying the outdoors and possibly the company of others.
Ireland’s first Nordic walking club is The Dublin Phoenix Nordic Walking Club (nordicwalkers.ie) was set up in 2008. A short instruction course is recommended to learn how to use the walking poles used to ensure good technique. Proper warm up, cool down are important in this activity as with any other..
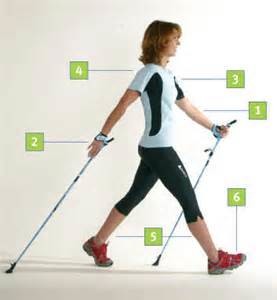
The key difference between regular walking and Nordic walking is the extra upper body workout. Held at an angle to the rear as you walk, the poles exercise muscles in the arms, shoulders, chest, abdomen, back and neck. The poles make walking easier by giving you security and balance. They also distribute the effort on to all four limbs while giving you a full body workout. You forget you’re doing exercise as you walk and talk. While Nordic walking people can chat as they walk which has mental health benefits. It’s an outdoors, muddy, unglamorous sort of activity that suits all ages, weights and levels of fitness.
This attracts an older age group to this type of activity and make it ideal for those who are retired.
Nordic walking is a recommended physical activity for those recovering from breast cancer, lung or cardiovascular problems, joint replacements and some chronic pain conditions. It is also suitable for those keen to lose weight who don’t usually feel comfortable walking up hill.
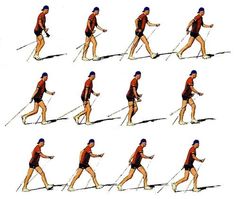
The key to Nordic walking is that as the pole pushes down and back, your body is pushed upwards and forwards giving you a nice gliding, flowing walk with good posture. It’s based on natural gait and natural walking rhythm but the poles help you walk more efficiently and symmetrically.
Nordic walking poles are specially designed, adjustable in height and are attached to your wrists with Velcro strips. You place the poles into the ground behind you as you walk in a rhythmical fashion – the left pole hits the ground as your right foot advances and vice versa. The key is to get into a rhythm without thinking too much about it. The poles give the upper body a gentle workout as you walk. The poles are also very useful as supports if you are walking uphill on rough terrain.
For more information please see http://www.nordicwalking.ie
Start Nordic Walking